How to Set Up a Backyard Greenhouse in Australia: A Complete Beginner’s Guide
A backyard greenhouse Australia gardeners can rely on year-round is one of the best things you can add to your plot. It lets you start seeds earlier, protect tender plants through frost, grow heat-lovers like tomatoes and capsicums for longer, and keep growing right through the cooler months. With our climate swinging from scorching summer heatwaves to frosty winter mornings, a greenhouse gives you a controlled space where your plants aren’t at the mercy of the weather.
If you’ve never owned one, the decisions can feel daunting. Where should it go? What should it be made of? Do you need a slab? How do you stop it cooking your plants in January? This guide walks you through every step of planning a backyard greenhouse Australia and New Zealand gardeners can grow in with confidence — so you get growing sooner.
backyard greenhouse Australia set up in a suburban garden
Why a Greenhouse Is Worth It in the Australian Climate
A greenhouse does far more than keep the rain off. It traps solar warmth, buffers temperature swings, and creates a sheltered microclimate that extends your growing season at both ends of the year.
In the cooler southern states — Victoria, Tasmania, the ACT and the higher parts of NSW — overnight winter lows sit around 2–5°C, enough to stall or kill frost-sensitive plants. A greenhouse holds them safely above freezing and lets you raise seedlings weeks ahead of anyone gardening in the open.
In warmer regions the value flips: paired with shade cloth and good airflow, a greenhouse protects seedlings from harsh sun and keeps you growing when the outdoor garden is too hot or dry. Either way you get earlier harvests, healthier seedlings, protection from pests and wild weather, and the ability to grow varieties that wouldn’t otherwise survive locally.
Backyard Greenhouse at a Glance
Decision
Beginner-friendly answer
Best position
Full sun, level, sheltered from wind, near water
Orientation
North-facing; long axis running north–south
Glazing
Twin-wall polycarbonate (tougher, warmer, safer than glass)
Panel thickness
6mm for most of Australia · 10mm for cold zones
Foundation
Level gravel, paver perimeter, or concrete slab — always anchored
Ventilation
Roof + side vents, a fan, and summer shade cloth
Winter heat
Frost cloth for hardy plants; thermostat heater for tender ones
Step 1: Choose the Right Spot in Your Garden
Where you put the greenhouse matters more than almost any other decision. Look for a spot that is:
In full sun. Choose an open position away from the shade of buildings, fences and large trees. In winter the sun sits low, so check where shadows fall on the shortest days, not just in summer.
Level and well-drained. A flat site makes construction easier and stops water pooling around the base. Avoid low spots where cold air and moisture collect.
Sheltered from strong wind. Use an existing fence or hedge as a windbreak on the side of the prevailing wind — without blocking your sun.
Close to water and power. Being near a tap and a power point makes watering, heating and lighting far simpler later.
Step 2: Get the Orientation Right for the Southern Hemisphere
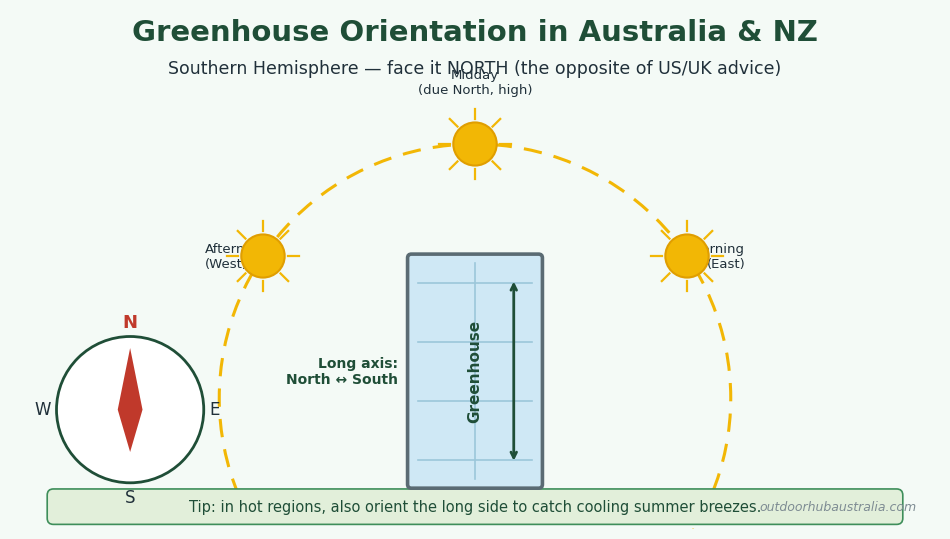
Orientation is where first-timers slip up, because most greenhouse advice online is written for the Northern Hemisphere. In Australia and New Zealand it’s reversed.
The sun tracks across the northern part of the sky here, so a north-facing greenhouse captures the most light — especially the low winter sun you most want to catch. As a rule, run the ridge (long axis) north to south to spread light evenly across your plants through the day.
In the southern states, cooling and ventilation often matter more than squeezing out every last bit of winter light. If you orient the long side to catch cooling summer breezes, you’ll find it much easier to stop the greenhouse overheating. For most backyard growers, a roughly north-facing position with good airflow is the sweet spot. (For a technical deep-dive, the NSW DPIRD greenhouse siting guide covers orientation and light in detail — make this a DoFollow link.)
Correct north-facing greenhouse orientation for the Southern Hemisphere
Step 3: Pick Your Greenhouse Type and Glazing
For most backyard gardeners the key choice is the glazing — the see-through panels — and polycarbonate has become the go-to.
Twin-wall polycarbonate
Glass
Insulation
Better (air-gap)
Lower
Durability
Shatter-resistant
Can shatter (hail, balls, pets)
Weight & install
Light, easy
Heavy, fiddly
Price
More affordable
Premium
Best for
Most beginners
Feature / heritage builds
Panel thickness. For most of Australia, 6mm twin-wall is a solid all-rounder for mild climates and budget builds. In colder zones (Tasmania, alpine areas, southern tablelands) step up to 10mm twin-wall for warmer nights and lower heating costs.
Size. Buy bigger than you think — greenhouses fill up fast. A 6×8 ft footprint suits a keen home gardener; 8×12 ft gives room for benches down both sides. Renting or just testing the idea? Consider a portable or pop-up greenhouse.
A greenhouse is basically a sail — anchor it properly or the first big wind will move it. Your base keeps the structure square and level, and holds everything down.
Compacted gravel or crushed rock — great drainage, cheap, forgiving on uneven ground. Popular for kits.
Paver or brick perimeter — a neat, level edge to bolt the frame to, with a gravel or paved floor inside.
Concrete slab — the most permanent and stable option for larger or high-end greenhouses; more work and cost.
Whatever you choose, get the base dead level and firmly anchored with ground anchors or bolts. Time spent here saves years of headaches.
Step 5: Set Up Ventilation and Cooling
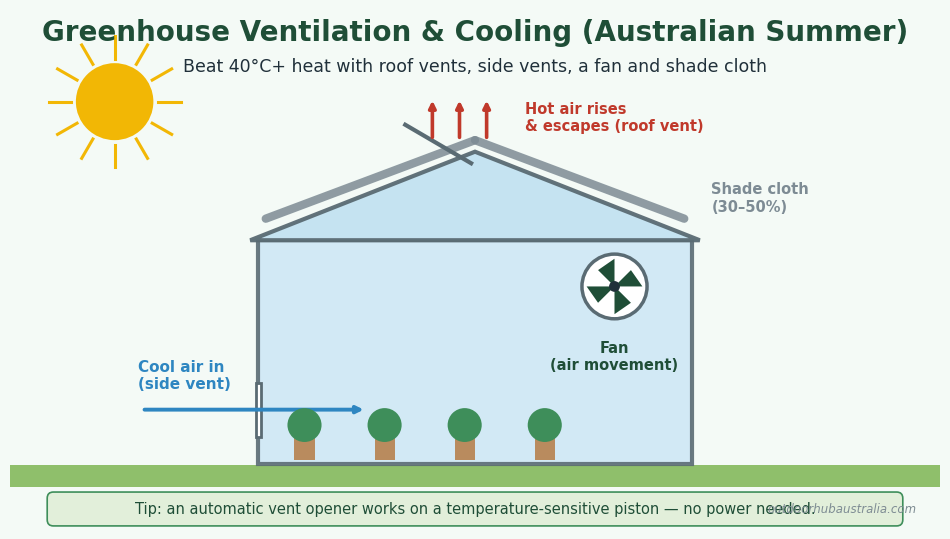
greenhouse ventilation and cooling setup for an Australian backyard
This is the step new owners most underestimate. A closed greenhouse in an Australian summer can climb well past 40°C in no time — which cooks plants rather than helps them. Build in at least two layers of cooling:
Roof vents and side vents to let hot air escape and draw cool air through. Automatic vent openers (a temperature-sensitive piston, no power needed) are a cheap, brilliant upgrade.
A small fan to keep air moving, cut humidity and prevent fungal disease.
Shade cloth over the roof in the hottest months; 30–50% is a common range for greenhouses.
Overheating is the #1 killer of greenhouse plants here — see our full greenhouse ventilation guide for vent sizing and airflow.
Step 6: Plan Heating for Winter (If You Need It)
Whether you need heat depends on where you live and what you grow. Without any, a greenhouse eventually drops to the outside overnight temperature — the glazing slows the fall but doesn’t stop it.
If you’re only protecting hardy seedlings, the greenhouse’s insulation plus frost cloth on cold nights may be enough. To keep tender or tropical plants going through a cold-zone winter, add a thermostat-controlled heater. As a rough guide, a ~300W fan heater can hold a compact greenhouse at 12–15°C on cold nights. Lining the panels with bubble insulation over winter cuts the bill further.
Benches and staging down one or both sides at a comfortable working height.
Shelving above the benches for smaller plants and supplies.
A watering setup — a simple drip system or self-watering trays keep moisture consistent and save time.
A min/max thermometer so you can see how hot and cold it really gets, and adjust vents and heating accordingly.
What to Buy for Your First Greenhouse
Priority
Buy
The greenhouse
6mm twin-wall polycarbonate kit (10mm for cold zones)
Base
Ground-anchor kit + gravel or pavers
Cooling
Auto vent opener + 30–50% shade cloth
Airflow
Small circulation fan
Winter
Frost cloth (hardy plants) or thermostat heater (tender plants)
Inside
Staging bench, shelving, min/max thermometer
Common Beginner Mistakes to Avoid
Buying too small — the single most common regret. Size up.
Skimping on ventilation — more greenhouse plants die from heat than cold in Australia.
Poor anchoring — one storm can wreck an unsecured greenhouse. Fix it down.
Ignoring winter shadows — a summer-sunny spot can be shaded in winter.
Forgetting shade cloth — in our climate, cooling gear matters as much as heating.
Frequently Asked Questions
Which way should a greenhouse face in Australia? North, with the long axis running north–south, to catch the most light in the Southern Hemisphere — especially the low winter sun. In hot regions, also prioritise airflow and cooling breezes.
Do I need council approval for a backyard greenhouse? It depends on your council, the structure’s size and how permanent it is. Small kit greenhouses are often exempt; larger or fixed structures may need approval. Always check with your local council before building.
Polycarbonate or glass — which is better for beginners? Polycarbonate. It’s tougher, safer, lighter, insulates better and costs less — the lower-risk choice for a first greenhouse.
What can I grow in a backyard greenhouse? Seedlings and cuttings, tomatoes, capsicums, chillies, cucumbers, herbs, leafy greens, and cool-season crops in winter. It extends what you can grow and for how long.
How much does a backyard greenhouse cost in Australia? A quality kit ranges from a few hundred dollars for a compact model to several thousand for a large premium polycarbonate build, before the base and any heating.
Shop Backyard Greenhouses
Ready to set up your own backyard greenhouse Australia-wide? Browse our full range of Australian-ready greenhouse kits — from compact polycarbonate models for a first-time grower to large walk-in glasshouses, all built to handle local conditions, with nationwide delivery.
General gardening information only. Check local council requirements before installing a permanent structure, and follow the manufacturer’s assembly and anchoring instructions.

MARC ONEIL